Jeep Parts Wiki | Ford Parts Wiki
Home | Search | Browse
|
Body Service Manual August 1964 |
|
Prev

 Next
Next
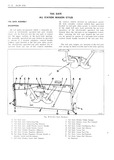
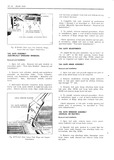
REAR END 2F l3 pillar by three screws The tail gate is counter caulxmo balanced by a single torque rod that is secured at the left rear body opening pillar by a mounting plate it 5 1 4j r l r and between the tail gate panels by a retainer welded to the tail gate right side facing When the f sg Q Qy tail gate is opened the end of the torque rod se Q l vl A p ix sl u1 E l to the body remains stationary while the remainder of the rod moves with the gate thereby creating an assisting torque for both lowering and wwe coven PANEL X misim the Eaten Atucumo scnzzw notes Figure 2Fl6 is a phantom view that identifies W and shows the relationship of major components yl DRAIN HOLES of the tail gate j tl l TAIL GATE INNER PANEL WATER DEFLECTOR M en m 7 On all tail gate inner panels a paper waterproof CAULIUNG comvolmo deflector is used to seal inner panel The deflector is installed and sealed so that any water entering WEW A the tail gate will run out bottom drain holes Fig 2Fl7 Toi Gore Water Deflector IMPORTANT Whenever work is performed on the ml we i pam Wwe the d has Also apply body eaplklllg compound pm each of been disturbed the eeflectvr must be prviverlv the inner ppver panel anaelilllg screw holes across Seelee to the tml are 1 new the ppnpm ofthe tail gale see zrlv 4 Position water deflector to tail gate inner R d I i panel with polyethylene coated side of deflector against inner panel Firmly press or roll sealed 1 Remete tml gate Umm Cover p m91 areas to obtain a good bond between deflector and tail gate a l 2 Using a sharp scraper or other suitable tool mum p ne carefully lift up edge of deflector and detach sealer 5 Clean off all excess caulking compound then and water deflector as required install previously removed tail gate inner cover panel NOTE DO NOT TEAR WATER DEFLECTOR TAIL GATE ASSEMBLY MANUALLY OPERATED WINDOW Installation Removul und Insiclluhon L Inspect water f1 t f r demee and rereir l Open tail gate With gate lll approximately a MW mars OY hvles Ot d with bOdY W t9YP OOf mp vertical position to relieve tension from torque PPh d tv Wm Sides f 1 f1 t r rod remove torque rod retainer attaching screws on rear body lock pillar Fig 2Fl9 2 If Ll new deflector is to be installed use old deflector as a template 2 With aid of a helper remove tail gate support attaching screws Fig 2Fl8 and fold supports 3 Apply a bead of body caulking compound ap against I Ear body pujm proximately 3 l6 diameter to tail gate inner panel Fig 2Fl7 3 Remove tail gate hinge attaching bolts at body pillar Fig 2Fl9 and remove tail gate assembly IMPORTANT The body caulking compound from body should be applied along the lower portion of the tail gate inner panel exactly as shown in illus 4 To install reverse removal procedure Prior tration to assure proper drainage of water to installation apply a coat of heavy bodied sealer through designated holes in inner panel into to surfaces of hinge straps that contact body pillar bottom of tail gate The bead of body caulking compound should cover the inner cover panel Check operation of tail gate and if necessary attaching screw holes at the top and sides of the adjust tail gate in body opening as specified under tail gate Tail Gate Adjustments

 Next
Next