Jeep Parts Wiki | Ford Parts Wiki
Home | Search | Browse
|
Body Service Manual August 1964 |
|
Prev

 Next
Next
11311111
11311111
1111115
1111115
11111111
11111111
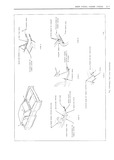
1J B ROOF PANEL FABRIC COVER NOTE If nitrile adhesive is not available use 13 Position and install fabric cover below back neoprene type non staining weatherstrip cement window opening See View C 1 15 ISM Super Weatherstrip Cement or equivalent Do not allow drying period 14 CP H1 I1t fabric Cover to rear compartment W mi W front and shelf panel below back window opening Be certain dielectric seams are straight IMPORTANT Application of nitrile vinyl trim 7 adhesive should be as thin as possible as an 15 Make Sure that fabric COVB1 ig Cmnpletelv excess amount of cement may rcsult in trappcd cemented iutlmnd buck iud w Op umg solvents blisters between fabric cover and roof i i 1 A1 1 11 t1 1 c 1 1 we 11 e 1v 16 using nat end punch and Mmmm install should also be as thin as possible as an excess drive Hang at hm k WmdOW Olwmug and wwf Gx amount of cement may result in highlights t nSiOum H b lt cement build up Exercise care when applying cement on inner layer of cover to prevent cement from contacting outer layer NOTE When installing drive nails it is best to first use an awl or similar tool to initiate a holc xi wan the ma of ri helper p s1m mum cover 111 1 et 1 1 1 1115 S11 1 1 1 be spaced 11 1 i x1 t 1y over roof panel and align seams at locating marks Z HPHYY 1111 U18 Stfiligllt and 1 in the radius previously made at front edge and at back window Strike drive nails only hard enough to seat them pmcywwld durilm I E Im mg Installation of drive nails should also be as low as possible in back window opening This will 7 Apply cement to exposed attaching Surface of T11 1 111 D1 V 11t111g Cllttimf edge of fabric cover due root panel and back window pinchweld flange t 1 missed 113111111 1 111 r W W11911 11 1V 1111115 F11 installed IMPORTANT No cement should contact the felt pad or uncovered portion of paint surface Sec 11 P Siti r mf 11 1 191 COVE 1 t 111 1 V 1 Fig U5 weld on studs and install retaining clips 18 Trim fabric cover along roof panel molding 8 As fabric cover is cemented to prepared 1 1i1111 1 66 F1 1J6 T1 1111111111 1 1O1t 1 21O92 pnytmu g pcnjf pane gut I grief uUgC ES in fnbyip or suitable small knife may be used to trim cover cover at weld on stud locations See Fig 1J4 Do Not Damage Paint Finish At front corners raise CCl l lltEf1 EET l T f cover and 9 At back window opening install a drive nail l1S111g scissors or sharp knife cut radius so roof at each seam location View D in Figure L15 panel molclincs cover cut edge Recement fabric cover to roof panel See View A Fig 1J5 NOTE When installing drive nails it is best to lirst use an awl or similar tool to start a hole in metal Drive nails at seam locations should ims cl l0E9R2 R MMING be installed only far enough to hold cover since V repositioning of the cover may be necessary 1L E f jZi 1 A Installation of drive nails should also be as low aitgqitll as possible in back window opening to prevent cutting edge of fabric cover by hammer blows 10 Apply E n a ima of mem to each side Or dielectric seams between fabric cover and roof i xi panel at back window opening View D Fig L t g11 1w 11511 I eac 4 Root PANEL 11 Cement 1 1 r1 at 1eit 1 1111 e te sw Mem Motnmc s etA Ner See View C D Fig U5 Pull fabric down and rearward and fasten cement only into back window o ening When o aeration is com nletcd fabric cover H should be free bf all wrinkles and draws in this TRIMMED EDC OF COVER ml area 12 Repeat step 11 on right side Fig lJ Trimming Fabric Root Cover

 Next
Next