Jeep Parts Wiki | Ford Parts Wiki
Home | Search | Browse
Prev

 Next
Next
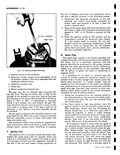
1 r I i Y i 5 Fig 11 6 Checking Spark Plug the spark plug gap The stronger spark will usually remove the carbon bridge from the spark plug gap If the problem occurs often it will be necessary to dismantle the heater unit and check the spark gap positioning and fuel spray pattern 3 If a buzzing sound still cannot be heard turn the heater off open the case and remove the burner assembly 4 Remove the spark plug and clean with emery cloth or steel wool 5 Inspect the spark plug for cracked porcelain and eroded or bent electrodes If these faults exist replace the spark plug or correct the off center condition 6 Reinstall the spark plug using 2 washers on the plug 7 Check and adjust ground electrode alignment and spark plug gap using gauge J 8368 as follows refer to Figure 11 6 a Check alignment of ground electrode by inserting alignment larger diameter end of gauge into mixer cup and piloting end of gauge into center flanged hole in mixer cup Rotate gauge to align step of gauge with ground electrode Ground electrode should contact surface of gauge step along entire length of step without forcing gauge into position f b If misaligned bend ground electrode with longnose pliers to obtain above alignment c With ground electrode properly aligned check gap between plug electrode and ground electrode by inserting opposite 085 end of gauge between electrodes GROUND ELECTRODE ALIGNED WITH AND CONTACTING THIS SURFACE r i Alignment and Gap with Tool J 836B d Adjust gap by bending ground electrode in a plane which will maintain the parallelism established in Steps a and b e Recheck parallelism Steps a and b and repeat Steps a d as required until correct gap and alignment is established Before reinstalling the burner connect the plug lead and check the are visually Be sure the burner assembly is grounded when conducting any tests with the spark plug There should be a steady intense bluish appearing are Since the burner must he removed for the above work it is suggested that tests of the fuel valve and nozzle be performed before reinstalling the heater See Item M If carbon bridging continues to be a problem with proper spray pattern and properly positioned electrodes relief may be obtained by moving the ground electrode away from the nozzle center line up to 020 additional to gauge distance Gauge locates ground electrode 220 from nozzle center line H Overheat Switch An overheat switch mounted on the heater case is wired in series electrically with the fuel solenoid coil The switch contains a bi metal blade which will open the circuit to the solenoid coil if the air temperature rises excessively This switch will automatically reset itself when the air cools If there is a loss of air or if the thermostat fails to cycle the heater off the heater will cycle on the overheat switch The overheat switch continuity may be checked by an ohmmeter test light

 Next
Next