Jeep Parts Wiki | Ford Parts Wiki
Home | Search | Browse | Marketplace | Messages | FAQ | Guest
Prev
 Next
Next
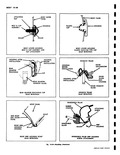
ENGINE COMPARTMENT LOWER GUTTER 1 SEALING STRIP Removal and Installation 1 Insert tip of Tool J 5757 at each clip location and carefully snap clips from sealing plugs 2 To install first check all sealing plugs for cracks or damage and replace where necessary NOTE If sealing plugs are loose and will not remain engaged in engine compartment lid EXTERIOR REMOVAL AND INSTALLATION ALL MODELS The exterior mouldings are secured to the body by any one or a combination of the following attaching screws attaching nuts snap retention on body parts bathtub type snap on clips of plastic construction snap in clips bolt and clip assemblies and moulding integral attaching studs Figure 10 84 depicts crosssection drawings which illustrate some of the typical methods used in attaching moldings to the body When removing and installing body exterior mouldings certain precautions should be exercised Adjacent finishes should be protected to avoid refinishing Proper tools and methods should be employed to guard against moulding damage particularly if the part is to be reused Whenever a sealing operation is disturbed appropriate sealing materials and methods should be used to provide the required watertight seal Every screw nut or clip that secures a moulding to a body outer panel including the attaching hole requires a specialized type of sealing operation An approved grade of medium bodied sealer and body caulking compound are the sealers used most generally in the effective sealing of these mouldings The exterior mouldings are identified in Figure 10 85 Bathtub type clips of plastic construction can be removed satisfactorily by cutting them part way through or all of the way through from the outer panel with a sharp flat bladed tool as shown in Figure 10 86 In some cases it may be necessary to cut the clip from each end to remove it WINDSHIELD PILLAR DRIP MOULDING The moulding of painted finish on the 0500 Series and of bright finish on the 07 and 0900 Series extends from the front of the roof drip moulding to the belt line The moulding is secured to the pillar with screws and requires sealing To remove the moulding open the door remove the attaching screws disengage the moulding from the pillar and unhook it from the roof drip moulding To install the moulding clean the mating surfaces of parts and apply a continuous ribbon of mediumbodied sealer 1 4 diameter along the center of the install a z x 1 piece of cloth backed waterproof body tape over sealing plug retaining hole Make two 5116 slits in tape to form an X pattern Check sealing plug for snug fit If plug is still loose repeat above operation by installing second piece of tape over existing repair Install sealing strip to lid by placing notched end of Tool J 5757 in loop of each clip and pushing clip into sealing plug MOULDINGS entire length of the moulding attaching surface Position the moulding to the pillar and hook the upper edge over the front edge of the roof drip moulding Align and seal the screw holes and install the attaching screws 700 MODELS Motor Compartment Lid Outer Panel Moulding Front Compartment Lid Outer Panel Moulding The moulding is secured to the lid outer panel by attaching screws and moulding T nut clips To remove the moulding raise the lid and remove the attaching screws To install the moulding apply body caulking compound to both sides of the attaching holes in the lid Position the moulding with aligned T nut clips to the lid align the moulding and attaching screw holes and install the attaching screws Front Fender Lower Moulding The moulding is secured to the front fender by a bolt and clip assembly at the center and by bathtub type snap on clips To remove the moulding remove the clip bolt nut inside of the front fender With a flat bladed tool carefully unsnap the moulding from each retaining clip To install the moulding replace any damaged clips and seal the replacement clips as required Apply body caulking compound to the center clip bolt and attaching nut Position the moulding to the fender and over the retaining clips and snap it into place Install the center attaching nut Roof Drip Moulding Front Scalp Roof Drip Moulding Rear Scalp The front and rear scalps are secured to the drip moulding by snap retention Both scalps the front and rear are comprised of a right and a left scalp The rear right scalp overlaps the rear left scalp Both of the rear scalps are overlapped at the front by the front scalps To remove a front scalp use a pointed hook tool and