Jeep Parts Wiki | Ford Parts Wiki
Home | Search | Browse | Marketplace | Messages | FAQ | Guest
Prev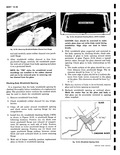

 Next
Next
e 11 I 1 v SECTION C C SECTION 7 When the glass and channel are properly positioned in opening slowly pull ends of cord starting at lower center of windshield to seat lip of rubber channel over pinchweld flange Cord should be pulled first across bottom of windshield then up each side and finally across top of windshield 8 Using a pressure type applicator seal inner and outer lips of rubber channel 2 fig 10 36 to glass with an approved weatherstrip adhesive Sealer is to extend completely around rubber channel 9 Clean off excess sealer from windshield glass with mineral spirits 10 Reinstall all previously removed parts and remove protective coverings 11 Water test windshield WINDSHIELD REVEAL MOULDINGS The windshield reveal mouldings are secured in a cavity of the windshield rubber channel The mouldings consist of an upper and lower reveal moulding and a right and left side reveal moulding The ends of the side reveal mouldings overlap the upper and lower reveal mouldings Removal 1 Remove windshield assembly from body and place it on a protected bench 2 Locate and mark center of upper and lower reveal mouldings 3 Carefully remove side reveal mouldings from cavity of rubber channel then remove upper and lower reveal mouldings Installation 1 Install and center upper and lower reveal mouldings in cavity of rubber channel then install side reveal mouldings NOTE To facilitate installation apply a mild soap solution to the cavity of the rubber channel prior to installing the mouldings 2 Install windshield assembly in body INSTRUMENT PANEL COMPONENTS INSTRUMENT PANEL COMPARTMENT DOOR Removal and Installation 1 Mark location of compartment door hinge on door inner panel 2 Remove hinge stop attaching screws fig 10 37 from door inner panel 3 Remove door hinge attaching screws from door inner panel fig 10 37 disengage hinge stop from door and remove door 4 To install engage hinge stop in door position hinge within locating lines and install attaching screws CORVAIR SHOP MANUAL